
In Response….(Trigger Jobs)
By Lee Shaver
Originally published in the January 2016 issue. Several weeks ago I received a letter from a faithful subscriber and as the response became much too long for the Letters & Queries section, I decided it would be much better presented as an article instead. Enjoy~
BARNES TO EXCHANGE:
I have a Remington Rolling Block problem; on firing the sear catches the half-cock notch 40-50% of the time.
A local gunsmith has suggested installing a fly, but a fly was not necessary when the rifle was originally produced. Another thought was eliminating the half-cock notch. I am extremely reluctant to do this. Is there a simple solution to this problem?
Thank you,
Garland Barnes, Arcata, California
EXCHANGE TO BARNES:
You’ve asked a question that I have dealt with numerous times in my years of gunsmithing. The easy answer is that a properly done trigger job will take care of the problem. But I would like to take this chance to explain what is going on with your rifle in hopes that it will put a little understanding out there for others with similar problems, or for gunsmiths that don’t really understand how to do a trigger job on some of these archaic arms.
One of the things I have specialized in for the last 30 plus years is trigger jobs. In that time, I have literally done thousands of them (probably around 1200 on Miroku 1885 rifles alone). Needless to say, I have done a lot of studying on trigger designs and concepts in that period of time, and I have seen a lot of things done wrong that I had to fix along the way. One of the more common problems with rolling block rifles that have had trigger jobs done on them already is the very problem you describe.
Let me begin by describing how the mechanics of a trigger should work when done correctly, and then I can easily describe what is wrong with it for your problem to happen. To do so I am going to lay out basic rules to trigger/sear geometry that is true for all triggers or sears that rotate such as how a rolling block trigger does.
Rule #1: The end of the sear tip must be ground or stoned to a radius with the pivot pin as the center of the arc. I built a fixture years ago to spin the trigger on the pivot point as I ground the tip. Failure to do this means that in order to rotate, the trigger must overcome some of the mainspring tension. The reason for this is because a flat end on any sear actually has to move the hammer and compress the mainspring a tiny bit for the sear to disengage. Once the tip of the sear has the proper radius on it then it needs to be polished smooth to limit friction and make it slide easily. 
Rule #2: The sear notch angle on the hammer must be exactly 90 degrees from an imaginary line running through the axis of the pivot point of the trigger and across the tip of the sear as pictured. (The working face of the full-cock notch must be flat and smooth.) 
Rule #3: The trigger return spring only needs about ¾ to 1 pound of tension on it. (It can be done with as little as ¼ pounds for target use only.) On a number of trigger mechanisms with heavy trigger or sear springs, I replace the factory trigger springs with one I make out of spring wire no more than .050” in diameter, and polish the surface on the trigger where the trigger spring rides so the two parts slide easily.
If you follow all these rules, the rolling block will have a smooth trigger pull of about 2 pounds. It will be safe enough that it will stay cocked even if you leave the trigger spring out, and it will not catch on the half-cock unless the half-cock is significantly taller than the full-cock notch. Right there is where I start my inspections when a problem like yours arises. I use my calipers to measure from the pivot hole of the hammer to the top of the half-cock and full-cock notches as shown in the picture here. If the half-cock is taller than the full-cock notch, then I will reduce the height of the half-cock a little to make sure the trigger should clear as the hammer rotates. Most of the time, the height is just fine and the problem lies elsewhere.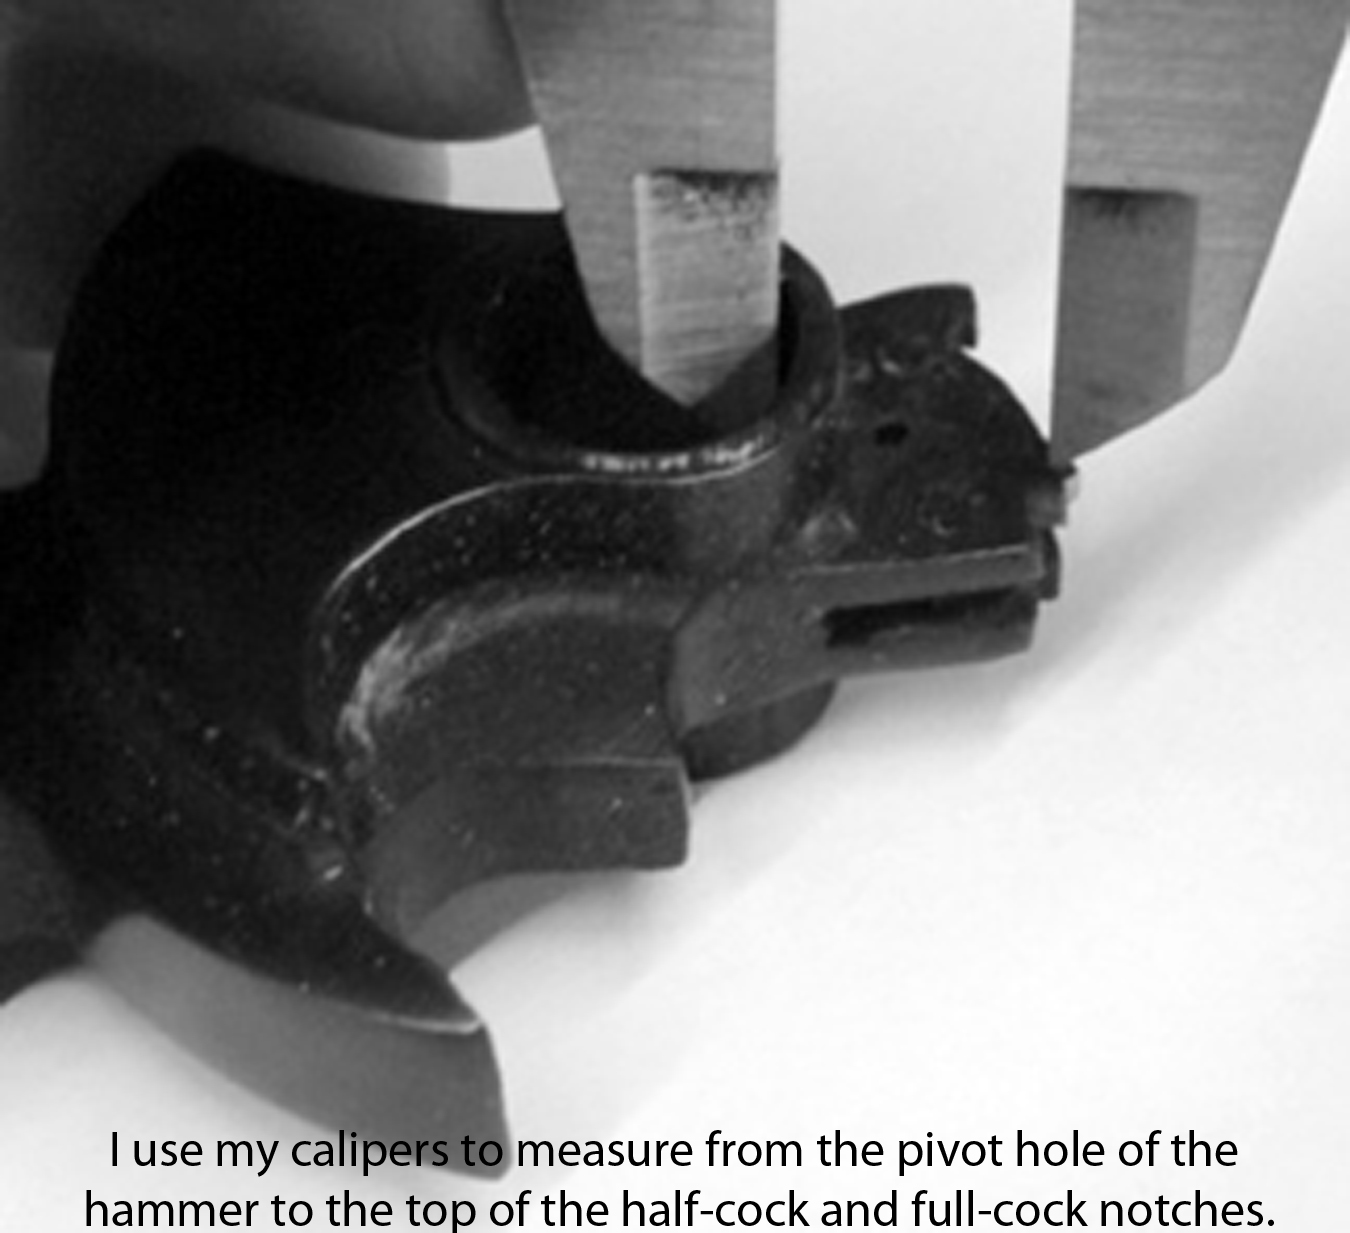
At first thought it would seem impossible for the trigger to catch on the half-cock if the half-cock notch is the same or lower than the full-cock notch, but it can and does happen regularly. The reason is almost always because the trigger spring is too strong and the full-cock notch angle is too open, or the working surface of the full-cock notch is curved as shown.
The process by which the trigger (sear) can disengage from the full-cock notch and still catch on a half-cock notch that is actually lower than the full-cock notch it just slipped out of is this: as you begin applying pressure to the trigger with your finger…the surface of your finger compresses. Once the compression of your finger reaches a point where the resistance is great enough to start the trigger/sear sliding in the full-cock notch—the sear point moves to a surface on the face of the full-cock notch that is stoned at an angle that is too open and is in effect a lubricated inclined plane.
Once the sear tip hits that inclined plane, the force of the mainspring is pushing that inclined plane against the sear and the main spring tension may be great enough to force the hammer forward and pop the sear out of the notch. Basically sliding the sear out of engagement like a shoe on a sloping ice covered sidewalk.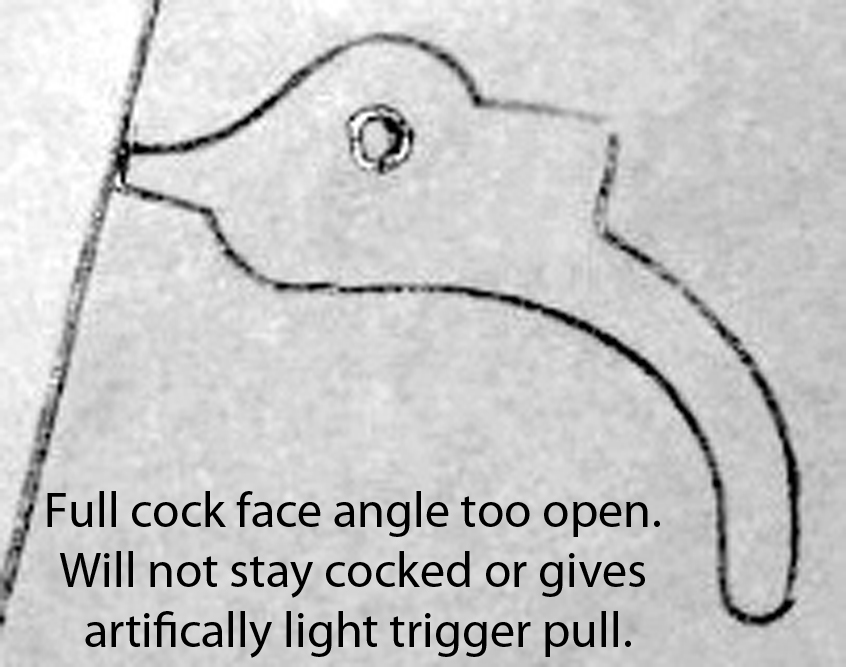
When this happens the lower part of the trigger is actually moving faster than the finger pushing it because the mainspring is now accelerating its travel, so the trigger pulls away from the finger just a little because it is moving faster than the tissues of the finger can rebound. As the tip of the sear passes the end of the full-cock notch, we now have a situation where the trigger is not pressed tightly against the finger and the trigger is basically freewheeling with a spring pushing against it.  The trigger/sear spring being stronger than necessary will pop the trigger back to your finger, thereby rotating the trigger back into place as if it were still engaged in the full-cock notch. While this is happening the hammer is rotating and the half-cock notch slams into the tip of the trigger/sear (doing damage no doubt).
There are two safety tests that all triggers must pass to get off my work bench:
Test #1: I put the trigger spring in and remove the mainspring. I then cock the hammer and apply pressure forward manually to mimic the tension of a mainspring. Then I carefully and slowly rotate the trigger to disengage it and watch for movement of the hammer. Factory triggers are set up so the hammer will rotate to the rear and compress the mainspring further as the trigger is rotated. A properly done trigger job will have no movement of the hammer (forward or backward), and an unsafe trigger job will allow the hammer to rotate forward as the trigger is moved.
Test #2: I then install the mainspring and remove the trigger spring and cock the hammer while pushing the trigger forward manually to make it catch in the full-cock. I then release the pressure on the trigger. If the hammer will not stay cocked it is NOT safe. If it can be bumped and will not stay cocked it is NOT safe.
Once a trigger can pass both of these tests and still have the trigger pull weight we were looking for, then it can be considered a safe and good trigger pull. From my years of experience with trigger jobs, my best guess is that your rifle will fail one or both of these tests. In fact, it is my experience that there are a lot of guns in use every day that will fail them.
Once a sear starts catching on the half-cock like yours is doing, it will typically get worse over time and in the process it will damage the sear and half-cock as well.~
Sorry, the comment form is closed at this time.